Microsoft Team Foundation Server is often the ALM platform of choice for BizTalk solutions, and you will most likely want to schedule and automate the builds of your BizTalk solutions using TFS Team Build. With the Deployment Framework for BizTalk, it's easy to set up an automated build of your BizTalk solution.
Prerequisites on the Team Build server
The prerequisites vary depending on which version of BizTalk you are using. Here's a list of the software that must be installed on the Team Build server:
BizTalk 2006 R2 and earlier:
BizTalk 2009:
BizTalk 2010:
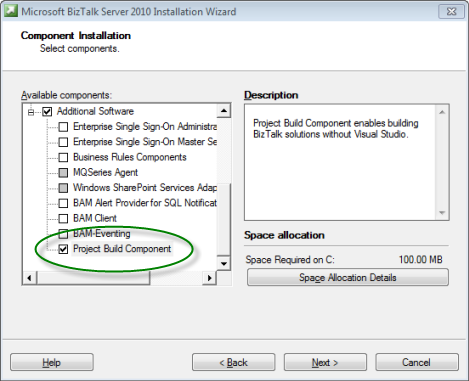
The following screenshot shows the Project Build Component in BizTalk 2009 and newer:
Building with BizTalk 2006 R2 and Earlier in Team Build 2005 or 2008
In BizTalk 2006 R2 and earlier, the only way to build a BizTalk solution via command-line (i.e. Team Build) is to run Visual Studio itself using devenv.exe and pass it the BizTalk solution file path.
To build a Deployment Framework for BizTalk MSI from Team Build 2005 or 2008:
1. Open or create a TFSBuild.proj Team Build build definition file
Please refer to the Team Build 2005 or 2008 documentation for instructions on creating a build type.
2. Remove and replace the default solution build step(s)
Replace the default solution build process with your own implementation. The following excerpt demonstrates a custom process to build the solution using devenv.exe, build the BTDF MSI and then copy it to the drop folder.
Note: The full TFSBuild.proj may be found in the Samples\TeamBuild folder under the Deployment Framework for BizTalk installation folder.
<Target Name="AfterCompile">
<!--Call DevEnv to build the BizTalk Solution-->
<Message Text="Building BizTalk solution using DevEnv"/>
<Exec
Command=""c:\Program Files\Microsoft Visual Studio 8\Common7\IDE\devenv" "$(SolutionPath)" /Build "$(BuildFlavor)""/>
<CallTarget Targets="BuildMSI" Condition="'$(DeploymentFramework)' == 'true'" />
</Target>
<Target Name="BuildMSI">
<!--Call batch file to build the MSI (if using Deployment Framework) -->
<Message Text ="Building MSI using $(DeploymentProjectDir)\BuildReleaseMsi.bat"/>
<Exec Command="BuildReleaseMsi.bat" WorkingDirectory="$(DeploymentProjectDir)"/>
<!-- Get the MSI to the appropriate drop location. -->
<MakeDir Directories="$(DropLocation)\$(BuildNumber)\$(BuildFlavor)" Condition="!Exists('$(BinariesRoot)\$(BuildFlavor)')" />
<Message Text="Copying msi from $(DeploymentProjectDir)"/>
<Copy SourceFiles="$(DeploymentProjectDir)\bin\$(BuildFlavor)\BizTalkSample.msi"
DestinationFiles="$(DropLocation)\$(BuildNumber)\$(BuildFlavor)\BizTalkSample.$(BuildNumber).msi"/>
</Target>
Building with BizTalk 2006 R2 and Earlier in Team Build 2010
In BizTalk 2006 R2 and earlier, the only way to build a BizTalk solution via command-line (i.e. Team Build) is to run Visual Studio itself using devenv.exe and pass it the BizTalk solution file path.
In Team Build 2010, use the UpgradeTemplate build template. The out-of-the-box WF-based build templates expect to be able to run builds using MSBuild.exe, which is not possible with BizTalk 2006 R2 and earlier. You can also modify the out-of-the-box WF-based build templates or create your own, but the simplest option is to stick with the UpgradeTemplate.
Follow the instructions in "Building with BizTalk 2006 R2 and Earlier in Team Build 2005 or 2008" above. Please refer to the Team Build 2010 documentation for information about changes between Team Build 2005/2008 and 2010.
Building with BizTalk 2009 and Newer in Team Build 2005 or 2008
In BizTalk 2009 and newer, BizTalk solutions may be built via command-line (i.e. Team Build) using MSBuild.exe against the BizTalk solution file. This means, as identified in the prerequisites above, that Visual Studio is not required on the Team Build server. BizTalk Server includes a special Project Build component for this purpose.
Follow the general instructions in "Building with BizTalk 2006 R2 and Earlier in Team Build 2005 or 2008" above, but run MSBuild.exe instead of devenv.exe. Please refer to the Team Build 2010 documentation for information about changes between Team Build 2005/2008 and 2010.
Building with BizTalk 2009 and Newer in Team Build 2010
In BizTalk 2009 and newer, BizTalk solutions may be built via command-line (i.e. Team Build) using MSBuild.exe against the BizTalk solution file. This is the model used by the out-of-the-box WF-based build template DefaultTemplate.xaml. The Deployment Framework for BizTalk includes a (very) slightly customized version of the Team Build 2010 DefaultTemplate.xaml that you can use to quickly configure your BizTalk solution build.
Note: The BTDFDefaultTemplate.xaml template may be found in the Samples\TeamBuild folder under the Deployment Framework for BizTalk installation folder.
To build a Deployment Framework for BizTalk MSI from Team Build 2010:
1. Check the BTDFDefaultTemplate.xaml build template into your team project's BuildProcessTemplates folder
Copy the Deployment Framework's BTDFDefaultTemplate.xaml file to your local team project workspace and add it to $/MyTeamProject/BuildProcessTemplates. Remember to add the file and check it in.
2. Create a new build definition
To begin, follow the same process that you would use to configure any other .NET solution build. Please refer to the Team Build documentation. Be sure to map your entire BizTalk solution source tree into the build workspace.
3. Configure the build process template (Process node) - Select build template
In the "Build process file" drop-down list, select $/MyTeamProject/BuildProcessTemplates/BTDFDefaultTemplate.xaml. Click "Show details" to expand the build process template pane if necessary. If BTDFDefaultTemplate.xaml is not in the list, click the "New..." button and select "Select an existing XAML file".
4. Configure the build process template (Process node) - Configure Items to Build
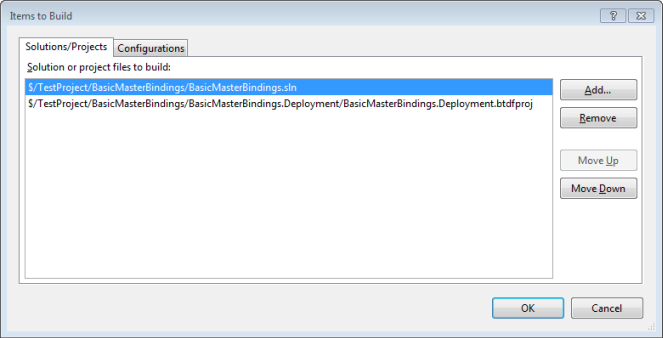
In the Items to Build property, click the "..." button to show the Items to Build dialog box. Add your BizTalk solution (.sln) file to the list on the Solutions/Projects tab. Then, add your BTDF project file (.btdfproj) to the list after the solution file.
Your Items to Build dialog should look something like this:
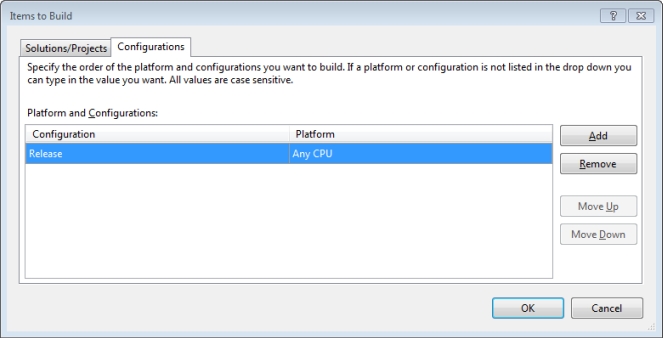
Next, select the Configurations tab. Configure a single line to use the Release configuration and Any CPU platform.
Your Items to Build dialog should now look something like this:
Click OK to return to the main dialog.
5. Configure the build process template (Process node) - Configure MSBuild Platform
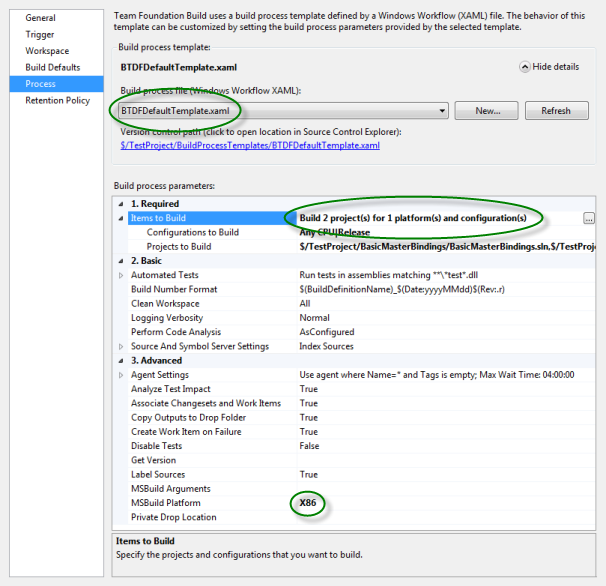
Change the MSBuild Platform setting to X86. This is only necessary on x64 operating systems.
6. Verify your Process configuration
Your build definition's Process tab should now look something like this:
7. Save and test the build definition
Save the build definition, then queue a build. The expected result is a successful build where the drop folder contains the BTDF MSI for the BizTalk solution.
Customizations to the Team Build 2010 DefaultTemplate Build Process Template
The custom version of DefaultTemplate.xaml included with the Deployment Framework for BizTalk as BTDFDefaultTemplate.xaml has only one simple modification: an extra parameter to MSBuild on the project compilation activity. This detail may be useful if you use a custom build workflow and need to add this modification to your own workflow.
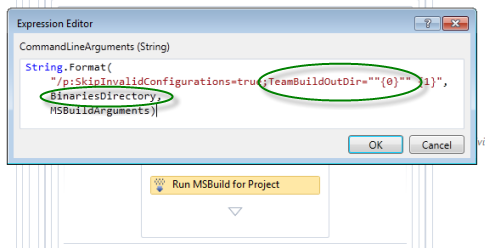
The following screenshot indicates the customized activity:

The only modification necessary was to add an MSBuild property named TeamBuildOutDir which receives the value of the BinariesDirectory variable.
Versioning the MSI with Team Build
The deployment project file (.btdfproj) includes a PropertyGroup that contains many MSBuild properties that help define the MSI. They include ProductVersion, ProductId, ProductName, ProductUpgradeCode and more. The important properties related to Team Build and MSI versioning are ProductVersion and ProductId.
Deployment projects build in Team Build using MSBuild, just like any other .NET or BizTalk project. That means you can directly reference any MSBuild property that is defined by Team Build. You can also modify your build process to pass a property value into MSBuild.exe with the /p switch.
If you generate or maintain a build version number formatted like X.Y.Z, you can pass it to MSBuild.exe with the parameter /p:ProductVersion=X.Y.Z to override the explicit value of ProductVersion in the .btdfproj file with the value provided during the build. You could also replace the explicit value in the .btdfproj file with an MSBuild property reference, using a property name that will be defined during the Team Build process: <ProductVersion>$(TeamBuildProductVersion)</ProductVersion>.
Any blog or other reference that discusses generating and maintaining version numbers in Team Build should directly translate to your Deployment Framework projects.
For Windows Installer to be able to automatically upgrade your application MSI's (see Enabling Automatic Upgrade in the MSI), you must increment the ProductVersion and replace the ProductId. The ProductId is just a GUID, so you can follow steps similar to those discussed above to override the explicit ProductId in the deployment project file.
NOTE: Windows Installer only considers Major.Minor.Revision when automatically upgrading an MSI, so for auto-upgrade to work you must increment one of those three components.
Updating Prerelease Deployment Project Files for Team Build Support
Native support for Team Build was added after publication of the final release candidate of Deployment Framework for BizTalk 5.0. Deployment project files created in any version of the Deployment Framework prior to V5.0 RTW require a few modifications:
1. Update the DefaultTargets attribute
In the Project element, change the DefaultTargets attribute value to Installer.
<Project xmlns="http://schemas.microsoft.com/developer/msbuild/2003" DefaultTargets="Installer">
2. Update the OutputPath elements in the default Debug and Release configuration PropertyGroup's
In the two PropertyGroup elements that are conditional on the Debug and Release configurations, replace the OutputPath element with two lines that are conditional on the property TeamBuildOutDir. The following example includes the new OutputPath elements. You may already have other elements mixed in with them, so just replace your two existing OutputPath elements with the four shown below.
<PropertyGroup Condition="'$(Configuration)' == 'Debug'">
<DeploymentFrameworkTargetsPath>$(MSBuildExtensionsPath)\DeploymentFrameworkForBizTalk\5.0\</DeploymentFrameworkTargetsPath>
<OutputPath Condition="'$(TeamBuildOutDir)' == ''">bin\Debug\</OutputPath>
<OutputPath Condition="'$(TeamBuildOutDir)' != ''">$(TeamBuildOutDir)</OutputPath>
<!-- Get our PDBs into the GAC so we get file/line number information in stack traces. -->
<DeployPDBsToGac>false</DeployPDBsToGac>
</PropertyGroup>
<PropertyGroup Condition="'$(Configuration)' == 'Release'">
<DeploymentFrameworkTargetsPath>$(MSBuildExtensionsPath)\DeploymentFrameworkForBizTalk\5.0\</DeploymentFrameworkTargetsPath>
<OutputPath Condition="'$(TeamBuildOutDir)' == ''">bin\Release\</OutputPath>
<OutputPath Condition="'$(TeamBuildOutDir)' != ''">$(TeamBuildOutDir)</OutputPath>
<!-- Get our PDBs into the GAC so we get file/line number information in stack traces. -->
<DeployPDBsToGac>false</DeployPDBsToGac>
</PropertyGroup>
For further reference, the Deployment Framework for BizTalk sample applications already include the correct configuration for Team Build.
Created with the Personal Edition of HelpNDoc: Full-featured multi-format Help generator