Customizing the Deployment Wizard UI


Deploying your application from Visual Studio is quick and easy, with nothing more than a click of a button required to deploy or undeploy your application. However, when it comes to your BizTalk servers, your BizTalk administrators will want and need more flexibility and hand-holding than you do as a developer. In this topic, we'll look at the graphical wizard that appears during deployments and un-deployments on a BizTalk server.
When you use the Deployment Framework for BizTalk to package your application into an MSI, and then install the MSI on a BizTalk server, you'll notice a couple of differences from your development workstation:
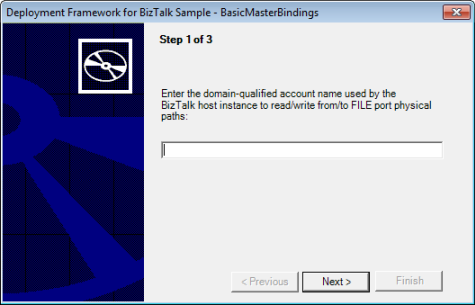
The typical wizard looks like this:
You have complete control over which pages appear in the wizard, and in what order. If you look in your Deployment Framework for BizTalk project folder, you'll find InstallWizard.xml and UnInstallWizard.xml. These XML files define all of the pages that the wizard will display during, respectively, deployment and undeployment.
The goal of the wizard is to define environment variables before launching MSBuild. Why? All environment variables automatically translate into MSBuild properties that can be referenced like $(EnvVarNameHere). We can use those environment variables/MSBuild properties to control our deployment!
The wizard UI is displayed by a program named SetEnvUI.exe in the Deployment Framework's Framework\DeployTools folder.
Two environment variables must be defined when MSBuild is launched on the server to deploy: ENV_SETTINGS and BT_DEPLOY_MGMT_DB. One environment variable must be defined to undeploy: BT_DEPLOY_MGMT_DB.
Let's look at a sample InstallWizard.xml:
<?xml version="1.0" encoding="utf-8" ?>
<SetEnvUIConfig xmlns:xsd="http://www.w3.org/2001/XMLSchema" xmlns:xsi="http://www.w3.org/2001/XMLSchema-instance">
<DialogCaption>Deployment Framework for BizTalk Sample</DialogCaption>
<SetEnvUIConfigItem>
<PromptText>Select the XML file that contains configuration information specific to this environment:</PromptText>
<PromptValue></PromptValue>
<ValueType>FileSelect</ValueType>
<EnvironmentVarName>ENV_SETTINGS</EnvironmentVarName>
</SetEnvUIConfigItem>
<SetEnvUIConfigItem>
<PromptText>Is this the LAST server in the BizTalk Group you are deploying to?</PromptText>
<Caption>This is the LAST server in the BizTalk Group</Caption>
<PromptValue>true</PromptValue>
<ValueType>Checkbox</ValueType>
<EnvironmentVarName>BT_DEPLOY_MGMT_DB</EnvironmentVarName>
</SetEnvUIConfigItem>
</SetEnvUIConfig>
Notice the DialogCaption element. This element may appear only once, and it defines the text in the title bar of the wizard.
You may include one or more SetEnvUIConfigItem elements, but you will never have fewer than two in InstallWizard.xml and one in UnInstallWizard.xml due to the required environment variables mentioned above. The order of the SetEnvUIConfigItem elements in the XML file is the order in which they will appear as pages in the wizard.
Within a single SetEnvUIConfigItem are the following required elements:
PromptText defines the descriptive text that appears on the top right side of the wizard.
PromptValue defines the default value of the editing control defined by the ValueType element.
ValueType defines the type of editing control that appears on the right side of the wizard, below the text in PromptText. Valid options are Text, Password, FileSelect or Checkbox.
EnvironmentVarName defines the name of the environment variable into which the value from the editing control will be placed.
You may add additional SetEnvUIConfigItem elements in order to capture as many environment variables as you need. Use the environment variables within your .btdfproj file using the $(EnvVarName) syntax to easily customize your server deployments.
Created with the Personal Edition of HelpNDoc: Easy CHM and documentation editor