Step 2: Create a BTDF Project


You should now have the HelloWorld solution from C:\BTDF\Walkthrough1 open in Visual Studio and successfully built. The next step is to create a new Deployment Framework for BizTalk project.
A best practice for organization of BizTalk solutions is to divide the artifacts into separate assemblies. The HelloWorld sample instead has a single BizTalk project that contains schemas, a map and an orchestration, so we will make a couple of extra settings in the deployment project to account for that configuration.
Step 1: Create a deployment project with the Add New Project wizard
The first step with every new BizTalk application is to use the Add New Project wizard to create a Deployment Framework for BizTalk project.
1a. With the HelloWorld solution and HelloWorld BizTalk project visible in Solution Explorer, right-click the HelloWorld solution and choose the Add > New Project... command. The Add New Project dialog box will appear.
1b. Select the category named BizTalk Projects and locate the Deployment Framework for BizTalk Project template.
1c. Select the Deployment Framework for BizTalk Project template and, in the Name textbox, enter the value HelloWorld.Deployment. Ensure that the Location textbox contains the path C:\BTDF\Walkthrough1.
1d. Click OK to create the deployment project.
Step 2: Configure the initial deployment project settings
The next screen you see is the Deployment Framework for BizTalk Project Options dialog box. This dialog contains the most commonly used -- but not all -- Deployment Framework options. All of the options that you see here can also be changed later in the project file.
Since the HelloWorld project combines schemas, a map and an orchestration into one assembly, and the Deployment Framework normally has separate deployment options for those three artifact types, we must choose how to deploy them as one unit. Whenever a BizTalk assembly has schemas in it, the best option is to treat the entire assembly as a "schemas" assembly. That's because maps, orchestrations and most other artifacts in BizTalk are all dependent on schemas.
2a. In the Project Options dialog, set "Deploy orchestrations?" to False and set "Deploy transforms/maps?" to False. "Deploy schemas?" is set to True by default. Also set "Skip IIS/AppPool reset during deploy?" to True since this application has nothing to do with IIS.
2b. Click the Create Project button to complete the creation of the deployment project. A dialog box will appear confirming the project creation, and the deployment project file (Deployment.btdfproj) will open in the text editor. Click OK to close the confirmation dialog.
Step 3: Add the deployment project files to the solution
The Deployment Framework for BizTalk does not include a full-blown custom Visual Studio project type (like C#, VB.NET, etc.), so its project files do not appear as a project in Solution Explorer. However, it is easy to add the individual files to the solution for ease of access and source control integration.
3a. In Solution Explorer, right-click the HelloWorld solution and choose the Add > New Solution Folder command. Replace the default folder name with HelloWorld.Deployment.
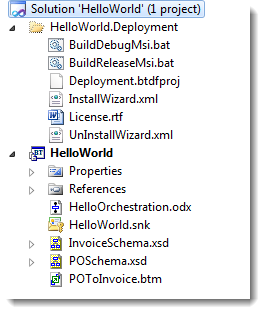
3b. Next, right click the new HelloWorld.Deployment solution folder and choose the Add > Existing Item... command. Browse to the C:\BTDF\Walkthrough1\HelloWorld.Deployment folder and select all seven files (two .bat files, one .btdfproj, three .xml and one .rtf). Click the Add button to add the files to Solution Explorer.
3c. Optionally, repeat the same Add > Existing Item... process to add the file HelloWorld.Deployment\EnvironmentSettings\SettingsFileGenerator.xml. When a solution is bound to source control, you may find that this file randomly disappears from the solution (which is automatically checked out), so sometimes it is easier to leave this file out of the solution and just ensure that it is added to source control.
Your solution should now look like this:
Created with the Personal Edition of HelpNDoc: Single source CHM, PDF, DOC and HTML Help creation