You should now have the HelloWorld solution packaged into an MSI in C:\BTDF\Walkthrough1\HelloWorld.Deployment\bin\Debug. The next step is to test the MSI installation and deployment.
Step 1: Undeploy the application
We can test the MSI installation and deployment on the local machine even though it is intended for a true BizTalk server. If you have not yet undeployed the application, it must be removed before we can test the MSI.
1a. On the Visual Studio main menu bar, open Tools > Deployment Framework for BizTalk and choose the "Undeploy BizTalk Solution" command.
1b. Watch the deployment script execute by opening the Visual Studio Output window. The script should complete successfully.
Step 2: Install the MSI
Deployment using an MSI is a two-step process -- install the MSI, then execute the deployment script.
2a. Double-click C:\BTDF\Walkthrough1\HelloWorld.Deployment\bin\Debug\HelloWorld-1.0.0.msi to start the installation process.
2b. Click Next through the wizard, accepting the default values, then click the Install button.
2c. Before clicking Finish to close the installation wizard, proceed to the next step.
Step 3: Deploy the application
Now that the application files have been physically delivered to the machine with the MSI, the application must be deployed into BizTalk.
3a. On the final page of the installation wizard, check the checkbox labeled "Start deploying to BizTalk when I click Finish," then click the Finish button.
3b. On Windows Vista and newer, you may be prompted for UAC elevation to Administrator privileges. Click Yes to allow.
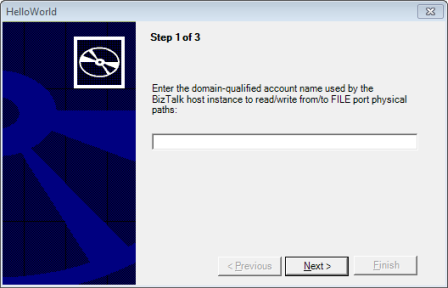
3c. The deployment wizard, below, appears to begin the deployment. This wizard is driven by C:\BTDF\Walkthrough1\HelloWorld.Deployment\InstallWizard.xml. The first default step asks for a domain- or computer-qualified user name (MACHINEorDOMAIN\Username). This user account will be granted full control permissions on any paths associated with the FILE adapter in the port bindings. Enter the user name that is used by your host instance(s) and click the Next button.
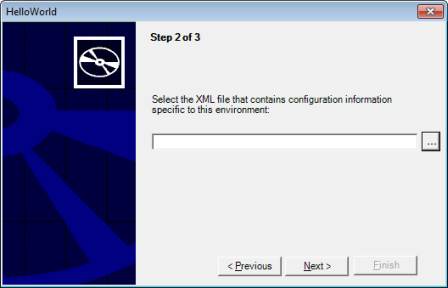
3d. The next page, below, asks for the path to an XML configuration file. This will be one of the environment-specific XML files exported from the Excel settings spreadsheet EnvironmentSettings\SettingsFileGenerator.xml. In this case, we are deploying to your development (local) machine, so select C:\BTDF\Walkthrough1\HelloWorld.Deployment\EnvironmentSettings\Exported_LocalSettings.xml and click the Next button.
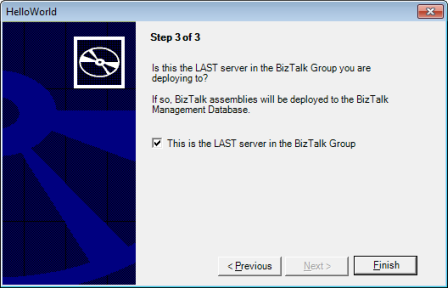
3e. The final page, below, asks if this is the last server in the BizTalk group. Since this is just your development machine, it's the last server in the group. Click the Finish button to start the deployment script. You will see the MSBuild script output appear in a Command Prompt window.
3f. The build should succeed with the message:
Build succeeded.
"C:\Program Files\HelloWorld for BizTalk\1.0\Deployment\Deployment.btdfproj" (Deploy target) (1) ->
(DeploySchemas target) ->
EXEC : warning : If any of the assemblies were previously loaded by a Host Instance, it may be necessary to restart the Host Instance for changes to take effect. ["C:\Program Files\HelloWorld for BizTalk\1.0\Deployment\Deployment.btdfproj]
1 Warning(s)
0 Error(s)
Disregard the warning because the deployment process already restarted the host instances.
Step 4: Test the application
Try sending a PO XML file through the application by dropping a file into the In folder. We should see an invoice XML appear in the Out folder.
4a. Copy the file C:\BTDF\Walkthrough1\HelloWorld\SamplePOInput.xml into C:\BTDF\Walkthrough1\In.
4b. Verify that a new XML file named {SomeGUID}.xml appears in C:\BTDF\Walkthrough1\Out.
4c. If the input file did not disappear or the output file did not appear, then follow standard BizTalk debugging practices to solve the problem before continuing. Check the Windows Application Event Log first.
Step 5: Undeploy the application
To undeploy the application, open the Start > Programs menu and locate HelloWorld for BizTalk 1.0. Choose the command "Undeploy HelloWorld" to launch the deployment wizard in undeploy mode. Click the Finish button to undeploy the application.
After the script completes, use the Windows Add/Remove Programs Control Panel to uninstall the "HelloWorld for BizTalk 1.0.0" application.
This concludes the walkthrough! You have learned how to create and configure a basic Deployment Framework for BizTalk project, configure a bindings XML file, deploy, test and undeploy the application both through Visual Studio and an MSI.
Created with the Personal Edition of HelpNDoc: Write EPub books for the iPad